At the Chicago Area Writing Project we focused our efforts on issues of civic engagement. Our writers published in EdWeek, California Educator, National Public Radio, and Chalkbeat Chicago. We raised our voices on issues that touch all of us both personally and professionally. This section will help you get started thinking about taking your writing public, with a specific focus on OpEd writing.
Join the Chicago Area Writing Project for a chat with Carol Jago called “When Teachers Write”. This meeting took place in August, 2022, and is a wonderful introduction to how and why to publish your writing. Before watching, please read this article by Mike Rose. We reference it throughout the course of Carol’s talk.
Part I: Sharing Our Stories
Activity: Let’s build on the writing exercises from the previous sections of this post, and start to write more deeply. As we know, every piece of compelling writing tells a story. The Chicago Area Writing Project worked on the writing project below as we continued to develop our public-facing writing.
Supplies: Writing utensil and paper or a computer document such as a Google Doc.
Time Needed: About 60 minutes
Steps:
What are the best ways to write for civic engagement?
Once you decide on a story to tell, home in on a singular part of it.
Editing
Final Touches
Step 1: What are the best ways to write for civic engagement?
Two men are installing a washer and dryer into a narrow space behind folding doors in my kitchen. Between them there is ongoing verbal and nonverbal communication to coordinate the lift, negotiate the tight fit, and move in rhythm with each other. They have to be quick—mine is the first of 15 deliveries—yet methodical and careful to avoid damaging the washer and dryer or injuring themselves. All the while, they are weighing options—how do they get these damned machines into this cramped space—and solving problems, the big one emerging when it becomes clear that the dryer doesn’t match up with my gas outlet. As they are finishing up, I compliment them on the speed and skill of the installation. They thank me, and one of them walks over a few steps wiping his hands and says it is rare that customers talk to them this way. “They treat us like mules,” he says
Rosie took customers’ orders, pencil poised over pad, while fielding questions about the food. She walked full tilt through the room with plates stretching up her left arm and two cups of coffee somehow cradled in her right hand. She stood at a table or booth and removed a plate for this person, another for that person, then another, remembering who had the hamburger, who had the fried shrimp, almost always getting it right. She would haggle with the cook about a returned order and rush by us, saying, He gave me lip, but I got him. She’d take a minute to flop down in the booth next to my father. I’m all in, she’d say, and whisper something about a customer. Gripping the outer edge of the table with one hand, she’d watch the room and note, in the flow of our conversation, who needed a refill, whose order was taking longer to prepare than it should, who was finishing up.
Step 2: Once you decide on a story to tell, home in on a singular part of it.
Prompt: What is a ‘small’ moment from your story that you could write into to truly express your classroom and/or teaching experience? What about Mike Rose’s (beautiful) writing can you imitate? Begin to draft your moment.
Step 3: Editing
Edit with someone who cares about you. In CAWP, that’s everybody. We broke into meeting rooms to share our drafts. You can employ someone in your house, a sympathetic relative, or interested co-worker. After reading a draft, editors should offer one thing they love and one question they have. (Along with any other constructive ideas, of course.)
Step 4: Final Touches
Put the final touches on your small moment. Congratulations! You have a story to add to writing currently underway – or you have the beginning of a brand new project!
Part 2: Sharing Our Stories
Activity: Your writing is coming along and getting close to finished. Now what do you do? How do you get your work into public-facing outlets? We’ve included two resources below – one that focuses on OpEd writing, another to guide you toward scholarly journals. Of course, these are not your only options. Civically engaged writing can take almost any form.
Supplies: Writing utensil and paper or a computer document such as a Google Doc.
Time Needed: About 60 minutes
Resources
The Op-Ed Project: A community of thought leaders, journalists, commentary writers and activists who proactively share our skills, knowledge and connections across color, creed, class, age, ability, gender, orientation, and beyond. Through our programs we elevate the ideas and knowledge of underrepresented expert voices, including women, and to accelerate solutions to the world’s biggest problems–problems that cannot be solved justly or sustainably without a diversity of voices, expertise, experience and identity.
Now that you have focused on a topic via Step 1: Getting Started Writing about Topics that Matter, follow the writing exercises linked here to help you think deeply and creatively. They’re fun and easily portable to a classroom!
“Specificity makes you think about details and details lead to greater awareness, increased sensibility, illuminating connections, and commonplace surprises.” Tony Romano
Activity: This is a wonderful exercise that will push you to consider specific details of your writing topics. The timed writing in each of the six steps (a cube has six sides, of course) will help you consider the small details of your topic you might have overlooked otherwise.
Supplies: A timer, a writing utensil, and paper or a device for typing (such as a Google Doc).
Time Needed: About 20 minutes
Steps:
Find: Find a topic about which you want to write. (You probably already did this in the first step of this post.)
Describe: Write for three minutes. Describe your topic. What are its defining features? What does it look like, smell like, feel like, etc.?
Parts: Write for three minutes. What are the parts of your topic? Think of as many ways as you can to separate this topic into discrete elements.
Compare: Write for three minutes. What does this topic resemble, look like, similar to, or remind you of?
Cause: Write for three minutes. What can your topic cause? Think of as many things this issue can cause to happen.
Change: Write for three minutes. How has this topic changed over time? Could it transform into in the future? Think to yourself, “before and after.” What was it in the past? What could it become in the future?
I Love You, but …
… love works best when it’s light on conflict. “I love you, you love me;” that makes for good times and bad verse. – Beth Ann Fennelly
Activity: This activity, an extension of Beth Ann Fennelly’s wonderful essay, was one of our favorites. It’s fun, funny, passionate, and deeply moving. With students, “I love you, but…” becomes a tool for close reading, complicating and thinking about issues, and a powerful way to acknowledge the ambiguity and ambivalence that is so much a part of growing up. Follow the instructions below to write your own decidedly complicated love poem.
Articulate your ardor. Why do you love your topic?
BUT. What is keeping your love from perfection?
Use those prompts to write a quick poem. Don’t overthink it.
Constrained Writing
Activity: Constrained writing is an exercise that delimits your writing through a certain condition or requirement. The ways to do this are endless, as all writing is constrained in some way. One of the most famous examples is Dr. Seuss’ Green Eggs and Ham, which was written in response to a bet between Seuss and his publisher that he could not complete a story using 50 or less words. In 2008, Paul Griffiths published a novel composed only of the 483 words spoken by Ophelia in Shakespeare’s Hamlet. Poetic form is constrained writing that is formal and established.
For this exercise, you will need some of your own writing – a minimum of five sentences. Remove all words containing the vowel “U” and replace them with a “non-U” word. Notice how your sentence structure and word choices change to raise your writing to the next level. Another Chicago Area Writing Project favorite, this exercise asks you to think about word choice in exciting and creative ways.
Supplies: Your own writing–at least five sentences, and a writing utensil and paper or a computer.
Time Needed: About 20 minutes
Example:
NO U’s! –> I have worked through several (at times very ridiculous) ideas for focusing this paper to arrive at what I hope is an interesting and useful collection of ideas and forms. Certainly, this work is grounded in narrative inquiry, but it is also autoethnography, straight-on creative writing, and doing-what-I-feel-like playfulness. Perhaps it best sits in traditions of creative scholarly writing and alternative methodological approaches.
NO U’s REWRITE –> I have completed several (at times very silly) ideas for rewriting this paper to arrive at what I hope is an interesting and innovative collection of ideas and forms. Certainly, this work is based in narrative traditions. However, it also represents efforts toward a new kind of scholarly writing and alternative methodological approaches.
Activity: Nicole Mirra writes with beauty and compassion about engaging students in civic issues. Her writing provides endless inspiration for educators, and we especially love Educating for Empathy: Literacy Learning and Civic Engagement.
In addition, the link below is a recording of a Chicago Area Writing Project meeting where Dr. Mirra spoke to us about her work. She speaks about empathy and the importance of a civic imagination.
Supplies: A writing utensil and paper or a computer writing document such as a Google Doc.
Time Needed: 120 minutes, but feel free to fast forward as needed.
Reflecting on Writing
Activity:What are the opportunities and impediments embedded in your writing practices? Take a moment to reflect on what ignites your creative energies, as well as what extinguishes them.
Supplies: A writing utensil and paper or a computer writing document such as a Google Doc.
Time Needed: About 30 minutes.
Prompts:
What would help encourage and sustain your writing practice?
How can we continue to engage civically as educators?
How can you include your students in civically engaged writing?
In this lesson, high school students will use a case study methodology to analyze the beginning and eventual halt to construction of the proposed road from Gasquet to Orleans in California. They will look at the question of Native Sovereignty in relation and opposition to Federal land use rights.
This original lesson took place in Humboldt County, Northern California, but can be adapted for a different local historical event because it allows students to closely examine historical documents and craft perspective-based papers that analyze multiple sides of an issue. For your own class, you could look at other examples of the exercise of Native Tribal rights on land or religious practices: See document for potential cases.
California Standards Addressed
CA History/Social Science Standards: 12.7 Students analyze and compare the powers and procedures of the national, state, tribal, and local governments.
C3 Framework
D2.Civ.1.9-12. Distinguish the powers and responsibilities of local, state, tribal, national, and international civic and political institutions.
D2.Civ.4.9-12. Explain how the U.S. Constitution establishes a system of government that has powers, responsibilities, and limits that have changed over time and that are still contested.
D2.Civ.5.9-12. Evaluate citizens’ and institutions’ effectiveness in addressing social and political problems at the local, state, tribal, national, and/or international level.
D2.Civ.9.9-12. Use appropriate deliberative processes in multiple settings.
Assessment
A Student Activity Matrix is provided in the related materials; this will serve as a portion of the assessment. A student reflection on the court case and arguments used will also be completed.
Have students choose a question for their table to discuss and try to provide a historical example.
How can people with different social values live together?
Should all students at a high school have the same values?
Should all people be allowed to share their values at school?
Should a majority have the power to coerce minorities to act against their conscience?
If a majority of students believe that uniforms should be imposed should everyone be forced to comply?
If a majority of students believe that a morning prayer should be practiced every day, should that become the policy?
2. Introduction of Focus Question
Should the federal government deny people access to their religion?
How does this question relate to the questions above?
Mentimeter poll and Discussion: why do we see the numbers so heavily skewed one direction?
3. Introduction to Target Question
Present target question:
Should the U.S. Forest Service have the power to build a road and to permit timber harvesting on the Six Rivers National Forest in the Siskiyou Mountains or should a religious community of some 4,500 persons who at the core of their beliefs, use the area for meditation and preparation for rituals?
Present Quote: “Over the years, the GO Road became much more than a conflict over natural resources. In large measure, it was a clash of two cultures–one driven by economic imperatives that demanded the landscape be altered and put to use to satisfy human material needs; the other asking that the landscape be left intact for the spiritual renewal and well-being of its inhabitants. Widely differing value systems held by Indians, environmentalists, and Forest Service personnel, more than anything else, fueled the fires of the GO Road dispute.” -Robert Dale
It’s helpful to have students complete a map on the area for familiarity with region, rivers, and mountains (not provided). Then students will read the Background and Summary of area pre-road, and review Timeline Summary of events from 19602-1980s. Students should refocus back to the major question: Who should be able to use the land?
6. Presentation of Differing Viewpoints
Create expert groups by breaking students into groups of 3 or 4, depending on class size. Students should use the graphic organizer to complete the graphic organizer. The groups are:
This part of the lesson will conclude with a class discussion, where students share out major ideas and thoughts of each position and fill in their organizer as other groups present. Use a Mentimeter poll to see where students stand on the target question and rank the groups in the order that you think they should have access to the lands in question.
Next, listen to the 1987 Supreme Court Case G-O Road oral arguments (total time is about 56 minutes and transcript is provided). Conduct a second Mentimeter poll: Who do you think won based on the oral arguments?
Next is the 1988 Supreme Court Decision. (Copies include majority and minority decisions.) This section is complicated and will require a teacher-led breakdown. You can also go here for basic ideas of the decision (also includes audio component).
Finally, look at the International Law perspective and see the Summary of Court Cases to learn how the case was taken to the Organization of the American States.
8. Outcome of Situation
A series of laws were passed that barred the construction of the road; see the document titled “Legislation” for a summary of laws that were passed that helped to protect the land in question after the Supreme Court decision.
9. Assessment
Student Activity Matrix (page 9) will serve as a portion of the assessment. A student reflection on the court cases and arguments used will also be completed, and students will answer the following questions:
Do they feel justice was served?
Can they think of other potential solutions to the case?
Are there any circumstances under which the case should be re-evaluated?
If this issue were to arise again, how might they proceed? What actions might they take? What would be most meaningful?
“Traditional ecological knowledge is a cumulative body of knowledge and beliefs, handed down through generations by cultural transmission, about the relationship of living beings (including humans) with one another and with their environment….”- Fikret Berkes
Overview and Context
This lesson helps students (8th grade and up) learn about the removal of Indigenous people from their land became a federal policy with the passage of the Indian Removal Act in 1830; it is part of a larger unit on the Removal Act. The process of removal created upheaval, suffering, and death among Indian people. However, they have survived and thrive as their own culture today.
One way the culture and history has been kept alive has been through stories and art. Oscar Howe was an artist who greatly contributed to recording this painful past while refusing to be limited to traditional art. Although this particular lesson focuses on Oscar Howe, this approach and these materials could be applied to another indigenous artist, perhaps one local to your area.
Related California History Standards
8.8 Students analyze the divergent paths of the American people in the West from 1800 to the mid-1800s and the challenges they faced.
2.Describe the purpose, challenges, and economic incentives associated with westward expansion, including the concept of Manifest Destiny (e.g., the Lewis and Clark expedition, accounts of the removal of Indians, the Cherokees’ “Trail of Tears,” settlement of the Great Plains) and the territorial acquisitions that spanned numerous decades.
Learning Objectives
Through the biography and art of Oscar Howe, students will begin to explore the importance of Native lands, lasting effects of Indian Removal policy on Indigenous people, and how art and poetry can be used to maintain and rebuild connections to land and culture.
Assessment
Students will write their own poetry and will then use their descriptions to create a watercolor painting using the colors, and shapes of the land.
Materials
Slide show of Oscar Howe’s life and art; “I am From” poetry outline; watercolor paints and paper.
This is a continued lesson about the Indian Removal Act. This lesson should take students to more of a feeling place to try to understand more deeply what it means to be connected to the land.
Next, teacher will ask students to do the following:
Close your eyes and think of a special place you have gone outside, out in nature.
Imagine the sounds, the colors, the shapes.
Open your eyes and write some adjectives that come to mind that would describe this place. Just a list, try to be as descriptive as possible.
Next, the teacher will ask a volunteer to read these quotes out loud:
The earth does not belong to man, man belongs to the earth. All things are connected like the blood that unites one family. Man did not weave the web of life, he is merely a strand in it. Whatever he does to the web, he does to himself. The earth is sacred and men and animals are but one part of it. Treat the earth with respect so that it lasts for centuries to come and is a place of wonder and beauty for our children.”― Excerpt from Chief Seattle
It is important to acknowledge the difference between western and Indigenous worldviews, particularly how they refer to and engage with Land and natural resources. Settler colonialism has attempted to separate humans from their environment by trying to convince us that we are somehow better or more sophisticated than plants, animals, rivers, or other natural resources. We have therefore been taught that it is our right to manage the Land as we see fit, and to harness its benefits for our own use, while neglecting the needs of entire ecosystems. Alternatively, Indigenous Peoples believe it is their responsibility to care for the Lands and Waters, and to maintain balance and reciprocity in order to ensure the health of the world as a whole.” ― Save the Salmon
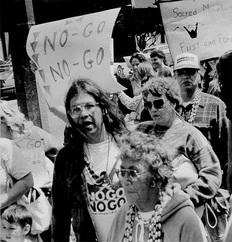
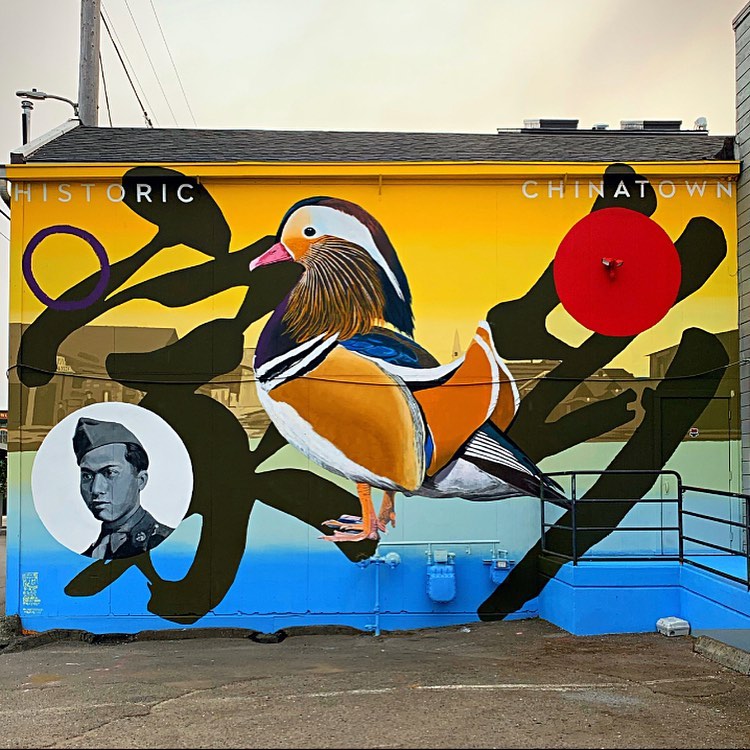
This lesson was created to learn about the Chinese Exclusion Act of 1882 through studying murals in Eureka, Northern California. Although this particular lesson was centered around the history of Chinese Americans in a specific area, the lessons about the Chinese Exclusion Act of 1882—and the consequences that followed—could be applied to other learning contexts for high school-aged students. Students analyze the relationship among the rise of industrialization, large scale rural-to-urban migration, and massive immigration from Southern and Eastern Europe and Asia.
Learning Objectives
Using the Eureka Mural titled “Fowl” as a central art piece, students will then learn about the history of Chinese Americans in the Eureka, Northern California Area and the consequences of the Chinese Exclusion Act.
Assessment
Guided notes and response sheets as well as verbal discussion about the use of a podcast when viewing a piece of artwork.
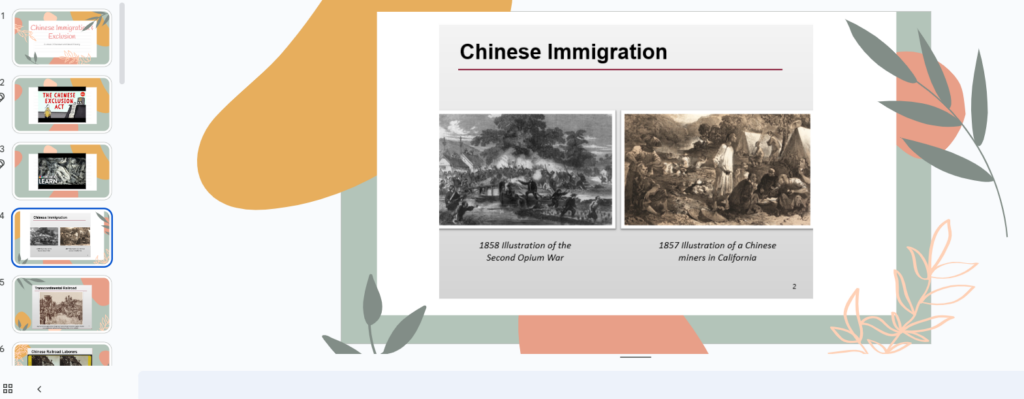
First, students will watch the following clips about Chinese exclusion:
The dark history of the Chinese Exclusion Act – Robert Chang, Ted-ED
The Chinese Exclusion Act, NBC News Learn
Using the Chinese Immigration and Exclusion guided notes, students are told to identify three things they learned or found interesting in the videos. Next, students will read the timeline and write a hypothesis for why Chinese immigration was restricted in 1882.
Why might the members of this organization have held these views?
What evidence does this document provide about why Chinese immigration was restricted in 1882?
Document B
How might the economic conditions described Doc B have influenced the opinion of the Pioneer Laundry Workers in Doc A?
Does this document provide evidence about what led to the restriction of Chinese immigration in 1882? Why or why not?
Document C
What is Pixley’s argument for ending Chinese immigration?
Where had Pixley been attorney general?
How might this corroborate information in the timeline?
Where did Pixley give this testimony?
What does this suggest about American voters’ opinions about Chinese immigration?
What evidence does this document provide about why Chinese immigration was restricted in 1882?
Document D
Who wrote the document?
How was the author’s perspective different from the authors of the other documents?
Despite the differences in perspective, how does the author’s letter corroborate Document A?
How does it corroborate Document C?
What evidence does this document provide about why Chinese immigration was restricted in 1882?
3. Reflection and Writing
Students will listen to a podcast and write a few sentences reflecting on the podcast, including interesting points of content about the mural and Eureka Chinese History.
Students will also spend some time browsing the Clarke Museum website (local museum website) on Immigration, Expulsion and Homecoming: The Legacy of the Chinese Exclusion in Humboldt County and discuss five interesting facts learned from this resource.
This unit will contain several lessons for students to contextualize their geographical relationship to their local watershed and determine local water issues pertaining to the watershed. Students will create a presentation utilizing a green screen app. This unit is adapted from the: “Advocacy & Water Protection in Native California Curriculum” developed by Save California Salmon. Also used is curriculum from Teacher’s Curriculum Institute (TCI) sections: Attending a Public Meeting & Testifying Before a Public Body. This lesson was created for grades 6-12, and can be adapted for students to learn and write about other local environmental areas and issues, particularly issues that involve water and indigenous land.
Related California Standards
CCSS. ELA-Literacy.W.9-10.1
CCSS.ELA-LITERACY.SL.9-10.5
CCSS.ELA-Literacy.W.11-12
HSS10.3.2
HSS.11.1
HSS.12.8
HSS.11.6.4
HSS.11.8.6
HS-ESS2-2
HS-LS2-7
Learning Objectives
Students will learn to contextualize where they live within a watershed and determine the conditions of that watershed.
Students will develop knowledge about local histories and analyze local environmental issues.
Students will learn how to write a letter to their local government agency or official about local environmental issues.
Students will learn about community advocacy through creating a three minute presentation/testimony that will be memorialized as a green screen.
Assessment
Students will be assessed through multiple measures. They will have completed graphic organizers throughout the unit. They will have a completed letter to a local government official or agency detailing what their concerns are for their watershed and the people that rely on the resources for the local watershed. Students will have created a green screen that will demonstrate students’ potential to advocate for a local watershed.
Resources and Preparation
Materials
Paper and pens/pencils
Internet access/laptops
Green Screen materials: green backdrop, tablets with green screen app, microphones
INTRO Trump Water Plan, the Shasta Dam Raise and the Fight for Sacramento River Bay Delta Salmon
Trump Water Plan, the Shasta Dam Raise, and the Fight for Sacramento River Bay Delta Salmon
INTRO Bringing Salmon Home Eel River Dam Removal
Bringing Salmon Home Eel River Dam Removal
INTRO Telling Your Story Outreach and Media
Telling Your Story Outreach and Media
Youth Water Advocacy & Education
Preparation
Preview lessons 1.3, 1.4, 3.3 & 3.4 from: Advocacy & Water Protection in Native California Curriculum. Also, preview lessons from TCI curriculum: Attending a Public Meeting & Testifying Before a Public Body.
Preview: How’s my Waterway? website and pick a location close to the school site to highlight and demonstrate how the website works.
Collect and prepare materials for green screen recording: green drop cloth, tablets with GS App, microphones.
Step-by-Step Instructional Plan
Day 1: How has California water policy and management impacted daily lives?
Discussion questions: Do you have access to clean water? Have you experienced droughts or flooding? Are there any canals or dams near where you live? (Advocacy & Water Protection, page 8). Create a classroom agreement if one is not already in place.
Students will watch a video discussing the Shasta Dam and the daming that has occurred with the resulting environmental degradation. Graphic organizer will be provided.
Video Reflections:
See Appendix 1: 1.3 Matching Activity for a worksheet to complete while students watch presentations by Regina Chichizola and Morning Star Gali (Advocacy & Water Protection, page 20)
In this session, Morning Star Gali and Chief Caleen Sisk both speak of the differing problems that are faced by non-federally recognized, unacknowledged, terminated, disenrolled, and disenfranchised Tribes and Tribal peoples. What are some of these problems?
How is federal recognition tied to the ability for Tribes to access resources and support?
Summarize what Chief Caleen Sisk says about 1) the importance of salmon to ecosystems and 2) the importance of salmon to Winnemem Wintu peoples.
How has the Shasta Dam impacted the ability for Winnemem Wintu peoples to participate in traditional practices or care for their ancestral homelands? (Advocacy & Water Protection, page 20)
Students will be guided to the ‘How’s my watershed?’ website and shown how to discover their local watershed. Graphic organizer will be provided.
Day 2: How has daming affected the ecosystem?
Students will watch a video about the Eel River and the effects that daming has had on the ecosystem downstream. Graphic organizer will be provided.
Students will be tasked with writing a letter to a local government representative about the conditions of the Eel, Klamath or any other watershed. They will be asked to report on their findings from the “How’s my watershed?” exercise and incorporate at least three actions that local officials may take to remediate or take action.
Exercise 3, Lesson 1.4
The Shasta Dam Raise would drown cultural and sacred sites used by the Winnemem Wintu peoples to this day and would further degrade salmon rearing habitat.
Option: Write to the Department of Interior telling them why the Shasta Dam should not be raised. (See Module 3 for information on how to write letters to public officials.) (Advocacy & Water Protection, page 21)
Day 3: How can students take action through writing?
Students will edit letters to their government officials.
Students will watch a video about writing for media and persuasive writing and create talking points for their Green Screen Project.
Video reflection (Advocacy & Water Protection, page 54):What are some examples of advocacy and some components of a successful campaign as described by Regina Chichizola? Have you ever participated in any of these activities? (E.g. public outreach, education, rallies, public speaking). How did it make you feel? What do you think makes for effective campaign strategies
How can media be a useful tool for advocacy? What other types of media might be useful? (Eg. social media, YouTube, blogs, magazines/zines, community newsletters, resource groups, story maps).
Which types of media reach which audiences? How do their stories and styles differ?
What kinds of things influence which stories are covered by the media? Has your perspective ever changed after hearing about an issue through a media source? What is a topic that you wish was covered more in the media? How can media be made more equitable in the types of stories they cover?
Look up some examples of press releases and op-eds. What are key aspects of writing a story or press release? How do they address the who, what, where, when, and why? Who is a good spokesperson or center for a story? How does explaining how you are impacted personally fit in with the sharing of facts and information? (Advocacy & Water Protection, page 54)
Exercise 4: Proposing Solutions (Advocacy & Water Protection, page 57):
Think of the water-problem you have been researching. Design a potential solution to this problem. Does it require a policy change or new regulations? Does it require that infrastructure like dams be removed? Does it require that a source of pollution be prevented from getting into waterways?
Write a letter to an official or create an infomercial describing your proposed solution. Explain how it would work and why it is important. Think about using diagrams and images. You could create before and after images or scientific literature to predict what this solution might do to the water system.
Days 4 and 5: Video Creations, Presentations, and Celebrations
Students will create a green screen video about their talking points with the idea that it would be a presentation/testimony for the initial three minutes of public comment at a public meeting.
Students will be shown a quick video about the application they’re using and be given time to practice what they have stated. Students will tape each other and use their devices to develop the background of their videos.
After everyone has created videos, a class celebration will occur, where all videos will be played together, whole group.
Accommodations:
ELL/Below Grade Level
Students may choose to create testimony/presentation in their native language having a partner that could also give the presentation in English. Both languages could be used in the final recorded presentation.
Students will be given sentence frames for classwork and model responses will be demonstrated to the whole group.
All instructions will be given both orally and in written form in Google Classroom.
Access to Google Translate can be offered.
Modified work will be assigned as per IEP or 504 plans.
Accelerated Learners
Students may create a CANVA infographic that visually summarizes their research and talking points.
Students may be offered an opportunity to explore the Fish Wars that occurred in the region and/or learn about water policy and law.
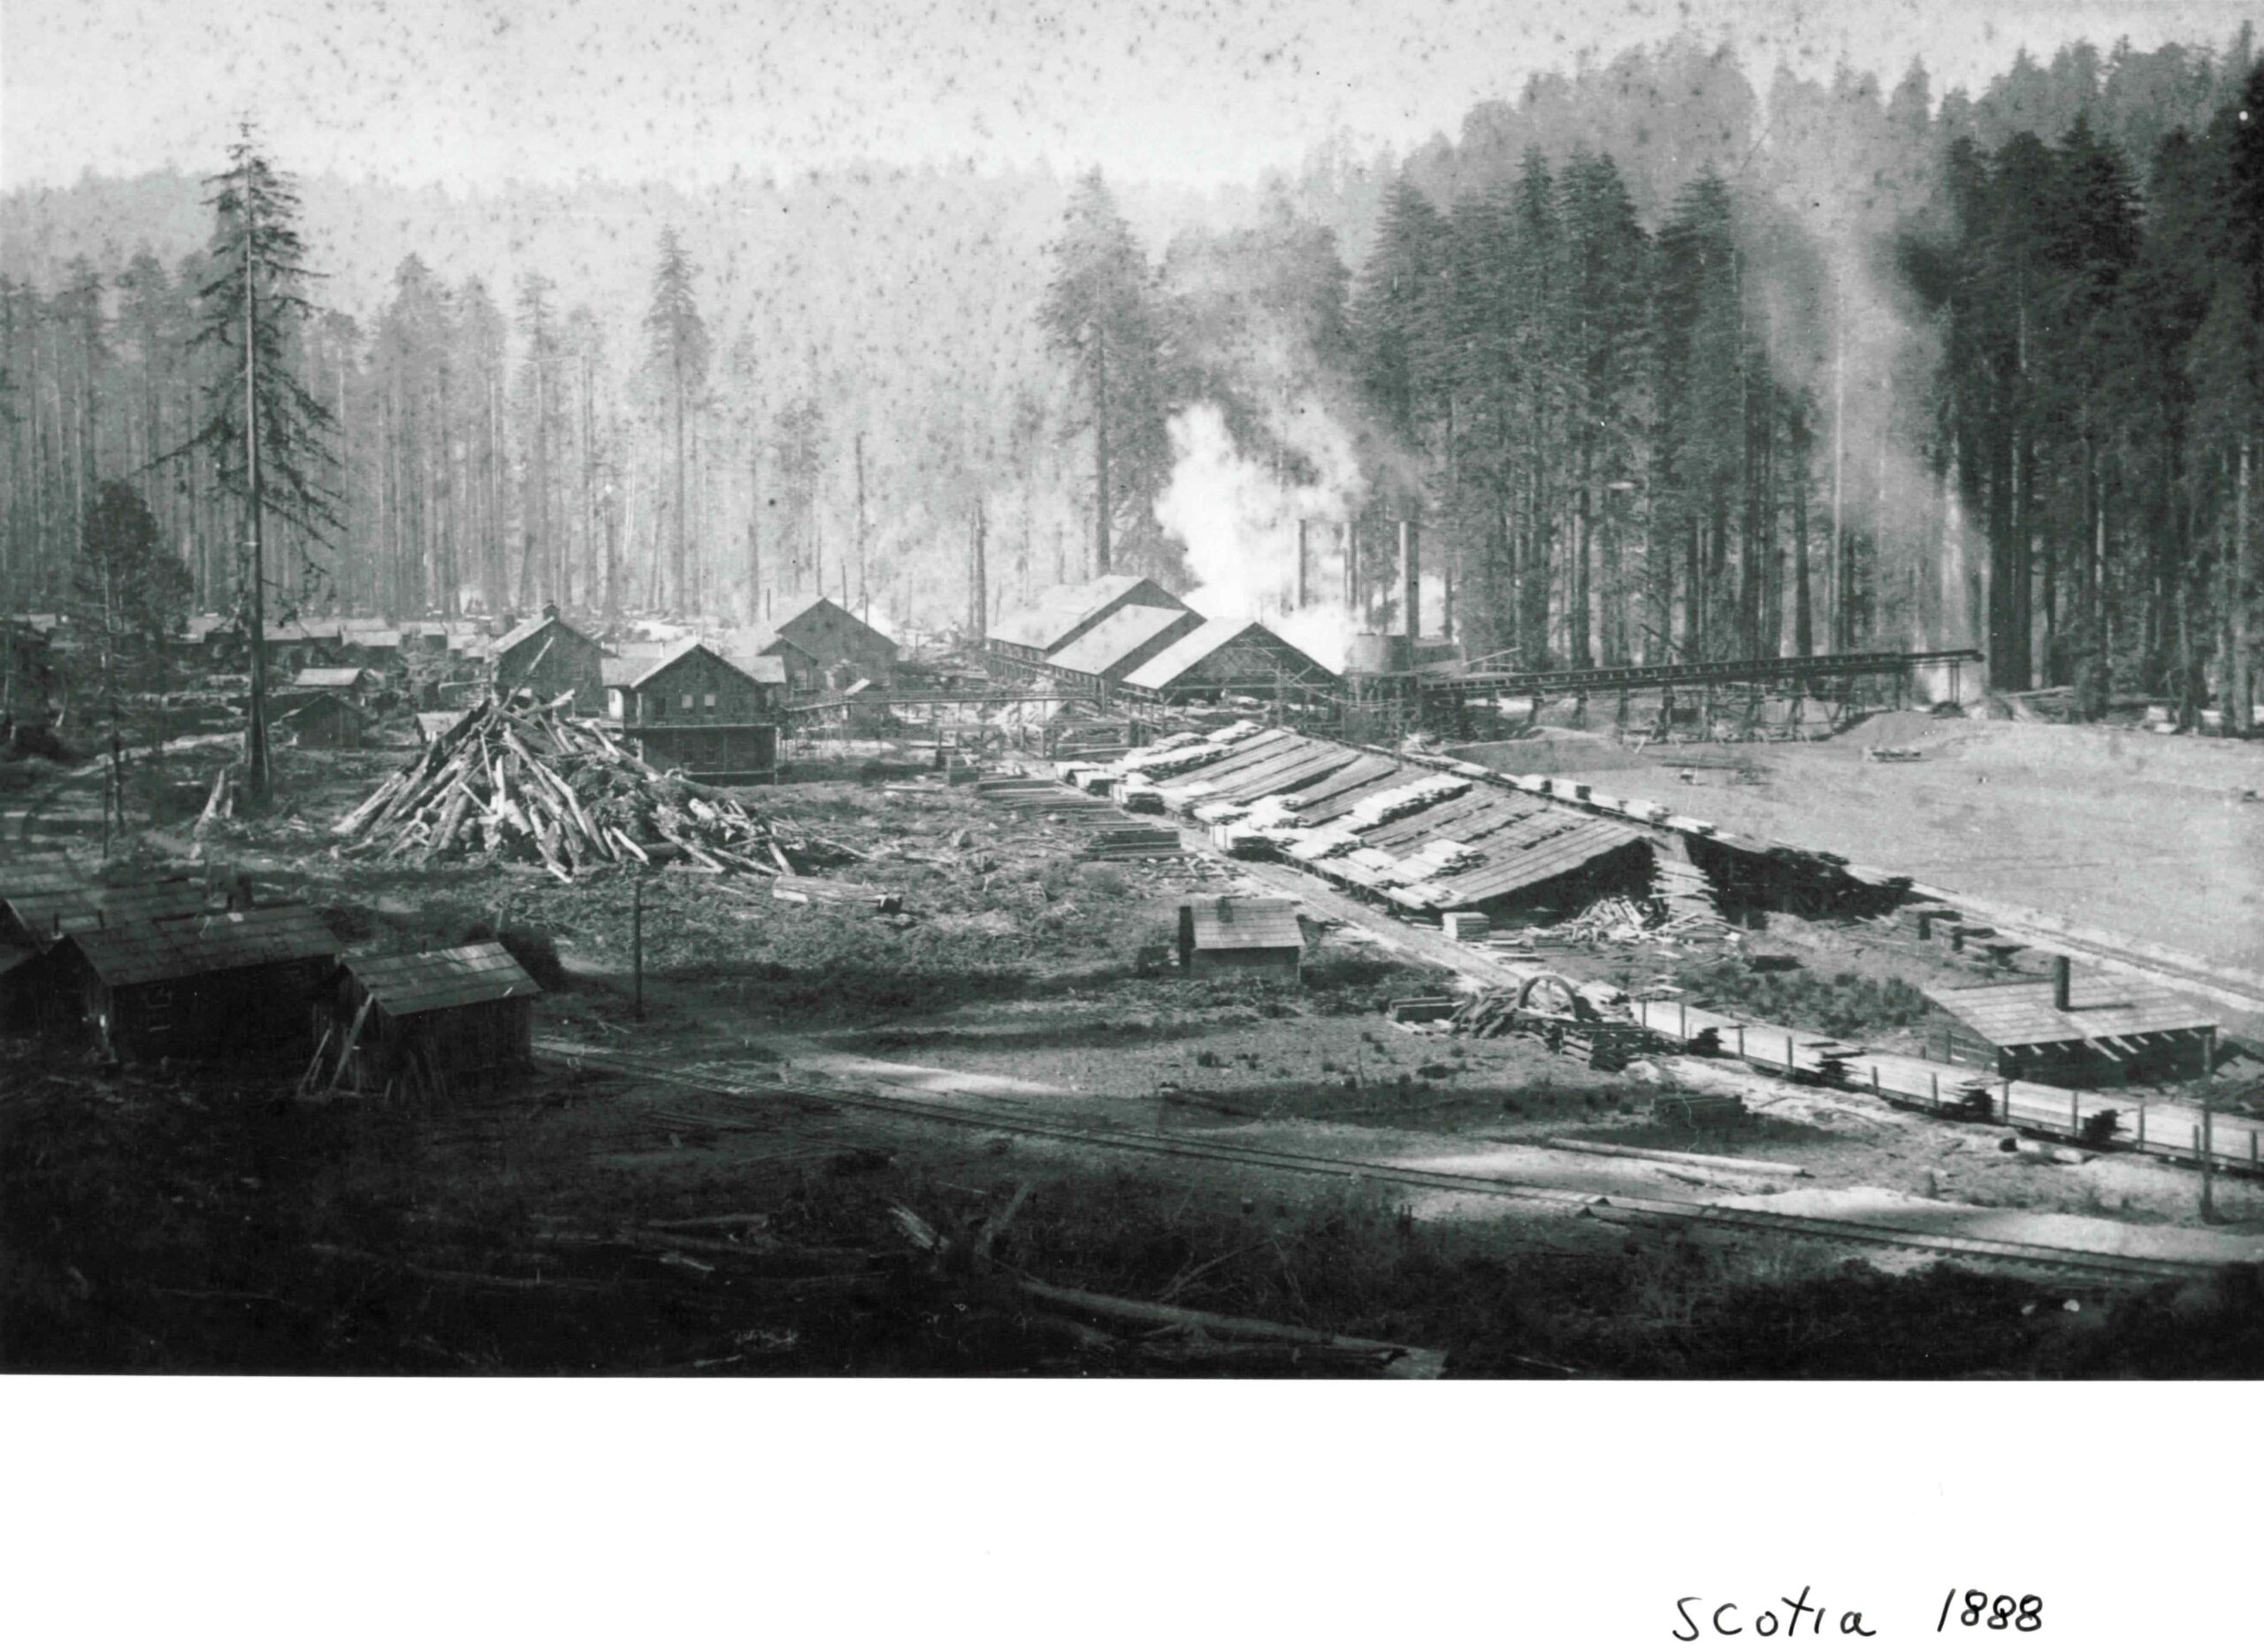
In this lesson, students will continue to learn how to create productive questions on any given topic in order to drive the conversation. This lesson was created for 5th-8th students in rural Humboldt County (Northern California) to learn about the local area (the town of Scotia) but could be adapted for other topics and/or for grades 1-4.
Learning Objectives
Students will be able to critically think and form questions about a specific topic.
Assessment
Students will interview community members as part of their research.
Resources
Students will need access to images related to the topic of discussion, a journal or graphic organizer to write questions and thoughts, and an environment in which they are able to discuss and formulate questions.
Prior to this lesson students have spent time throughout the school year going over the question stems. The question stems are a resource for the students that they are used to using on a regular basis. The teacher will need to find visuals for the topic they are teaching in class. These visuals can be images, infographics, objects, etc. There should just be a strong connection between the visual and the topic being discussed.
Step-by-Step Instructional Plan
1. See Think Wonder Strategy and Graphic Organizer
First, teacher will distribute the graphic organizer and discuss the expectations of the SEE-THINK-WONDER strategy. Teacher will give students time to complete one section at a time. In between each section take a small amount of time to debrief what the students have seen in the picture. (This is a good time to reteach the difference between see-think-wonder) Continue this process through each section of the graphic organizer. Sometimes depending on the group of students, the teacher might need to break them up even further or one section each day to allow for processing and retention.
2. Conclusion Statements and Wonder Questions
After the students have completed the activity, students should write a conclusion statement about what they have learned from the image to help them better understand the overall project. Using this information, students will brainstorm 1-2 questions that could be asked about the topic to help them better understand. In this specific situation, students will develop questions about Scotia’s past that they wonder about.
Next Steps
Students will use the questions created during the brainstorming lesson to interview local community members to learn more about the history of Scotia.
This lesson is aimed at grades 4-6, and will promote student research and learning about their community through the principles of listening and questioning. Students will apply these principles to an interview of one of their school’s staff members and use writing skills to tell the story they uncover. Some of these lessons may be one day lessons, but several of them will take multiple days or even a week.
Assessment
Students will be assessed through the attached rubric as well as through their Google Slides presentation.
Full Frame Essay: Humans of New York – A Global Community Connecting through Photographs
Step-by-Step Instructional Plan
Lesson 1: Overview: Why are we doing this?
This lesson is focused on learning about our school community and building connections between students and staff through shared experiences and storytelling. Students will learn how to conduct an interview, take photos that show emotions and write a narrative based on their interview.
Students will be given a general overview of the purpose of the lesson, which are:
To form connections between students and staff.
To learn interview techniques such as broad questions, listening, paraphrasing, and follow-up questions.
To identify emotions the speaker is showing and capture these feelings in photographic form.
To collaborate with a partner.
To write a narrative based on the interview.
To create a Google Slide presentation with pictures and story of interview subject.
Lesson 2: Identifying Emotions
After students have been given an overview of the unit we will begin by reading several of Brandon’s photo blogs. We will identify emotions of the subjects in Brandon’s pictures and compare what we see in the pictures to the emotions we identify in the narrative.
Lesson 3: What makes a good interview question for this assignment?
Ask open ended questions that invite the interviewee to tell a story about his or her life. We will brainstorm questions. We will focus on shared experiences in our community, such as how the fires affect us, the river, the importance of salmon and water and native dances. We will also discuss questions that are more generalized to the human experience, such as childhood, holidays, pets, etc.
Lesson 4: Role play
With a partner, role play a situation that you would find yourself in as a Humans photographer. One person will be the subject, and the other will be the interviewer. Students will need to think about the following. How will you approach your subject? How long will your interaction take? What type of energy will you need to make the subject feel welcomed and open? What kind of follow up questions are needed (and when) in order to elicit more information and feelings from the interviewee.
Lesson 5: Preparing the script
Using the list of questions the class has brainstormed, students will create a script for approaching staff to interview for our Humans of our School project. The script will include an opening conversation starter and a question about whether they are comfortable allowing you to take their photo. (All staff will be approached by me ahead of time so that I know they are willing to be interviewed, and can help prompt students if they get stuck) A few thought-provoking questions (both positive and negative) will get your subject to share their story—lastly, a wrap-up statement thanking your subject for their time.
Lesson 6: Becoming a photographer
We will look through the photos in one of Brandon’s books to find a few key features that make his photos memorable. Throughout all of his books, the techniques he uses are crafted so that the reader can better connect with his subject while getting a feeling for the subject’s surroundings. When taking photos for this project, keep these ideas in mind.
Try Different Angles:
First, it is essential to look at the use angles in all of Brandon’s photos. You will rarely see an image in which the subject sits/stands directly in front of the camera. The subject will typically be seen with a tilted head or an angled body.At certain angles, objects can also appear larger or smaller than reality. This is a fun way to change the context of the photo.
The angle of the background is a crucial component of Brandon’s photos. You will notice that the subject will always appear perpendicular to the background so that the picture has depth.
You will never see a photo of a subject standing in front of a wall or door. The depth of the images works in unison with the depth of content that the stories convey.
Fill the Frame with Your Subject
Making the subject the highlight of your photo is key to a Humans photo. The subject should always be in the center of your frame or slightly off-center to keep balance.
It is essential to balance the size of the subject with the surroundings. A good photograph needs balance. Try to limit objects that can distract the reader from the face. It is human nature for a reader to look at a person’s face in a picture immediately. Use this to your advantage.
Lesson 7: Writing an Effective Narrative
A narrative is a story told in the first-person point of view, which means the writer uses the word “I.” A narrative should begin with a topic sentence that introduces the subject matter and a specific thought or feeling the writer has. The middle part is called the body. The body is where you explain what happened in the story, usually chronologically. The body can include various components that may include details about the setting or conversations between characters. It is vital to include sensory details in the narrative story. The sights, sounds, smells, tastes, and touch you experienced during this period are essential to setting the scene. The narrative ends with a conclusion. A conclusion can include your thoughts or feelings on how the story made you feel emotional, discuss what you learned, wrap up the story, or provide a funny anecdote.
Topic Sentence
Body
Conclusion
Lesson 8: Finding Humanity
In the last assignment of this unit, we will explore the stories of the people that make up our school. Students will become a mini Brandon Stanton at our school to choose staff members to photograph and interview. Using the skills they have attained from this unit, their goal will be to create their very own human entry and make a Google Slide presentation about them. To start, they will need to seek out one or more staff members at our school, eventually sharing one of their stories in their presentation. It is important to have photography, interview, and note-taking skills to be successful.
Lesson 9: Creating a Google slide presentation
Student’s slide presentation will be a collaborative effort where groups are able to share the story of the staff member they interviewed.
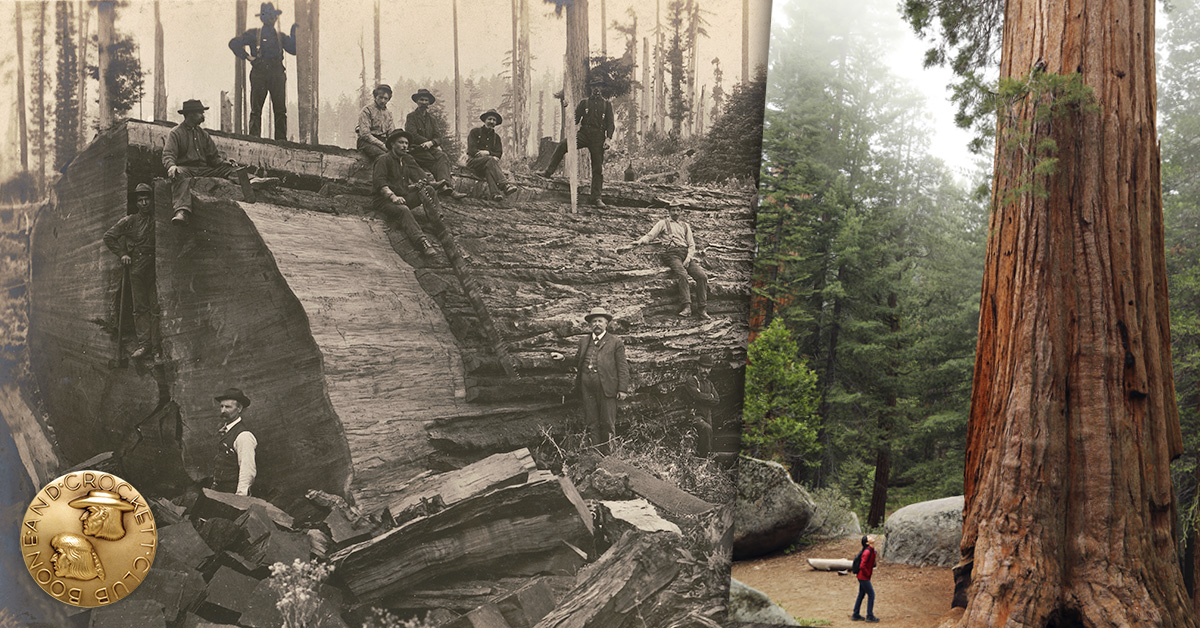
In this lesson plan, students will be able to get a better understanding of how the cultural and historical landscape has changed over time in Humboldt County California. Students will be focusing on areas of Redwood National Park and Beyond by comparing and contrasting historical/present photos of the park. Visual Thinking Strategies (VTS) will be used to help students understand and critically think when they are analyzing a picture. This lesson will help them understand the past and present surroundings of their community and help them engage and connect with their peers through intellectual discussions.
This lesson is an example of how you might create a lesson using the work of a local park–or other nature-based location– in your region as well as a lesson you may use to understand the Redwood National Park’s past and present. This lesson was originally designed for upper elementary school aged students (and above).
Related California Standards
CC.9-10.W.HST.2.a Text Types and Purposes: Introduce a topic and organize ideas, concepts, and information to make important connections and distinctions; include formatting (e.g., headings), graphics (e.g., figures, tables), and multimedia when useful to aiding comprehension.
CC.9-10.SL.1 Comprehension and Collaboration: Initiate and participate effectively in a range of collaborative discussions (one-on-one, in groups, and teacher-led) with diverse partners on grades 9–10 topics, texts, and issues, building on others’ ideas and expressing their own clearly and persuasively.
Learning Objectives
Students will be able to use visual thinking strategies to analyze and interpret information through images and academic discussions.
Assessment
Students will be assessed on their learning objectives through journal writings and academic discussions based on a score by rubric (see below).
1. Teacher will start the lesson off by posting the 1st image for the whole class to see and ask students to answer the questions “What do you see?”. Each student will have about 5 mins to formulate their response.
2. Teacher will continue asking the same question for images 2-4 and give students 5 mins for each image to formulate a response.
3. After the students have completed their responses, the teacher will then lead the students in a discussion about each image and ask the following questions
“What is going on in this picture?”
“What do you see that makes you say that?”
“What more can we find?”
Students will have opportunities to share their responses and build off their peers’ ideas and add to the discussion.
4. Teachers can write down certain questions and responses to see if there are any themes within the pictures.
5. Teacher will then assess verbal and written responses using the rubric to see if students obtained VTS strategies.
Next Steps
Teachers can do this exercise daily to help students develop more VTS strategies through reparations.
Extensions and/or Enrichment
Teachers could have students create a story from the images that they see.